With your models finalized (and hopefully with their history deleted), it's time to begin setting yourselves up to paint a texture. To do this we're going to want to adjust the model's UV Layout. By default Maya will have aligned your UVs in... a terrible fashion. So let's get on fixing that.
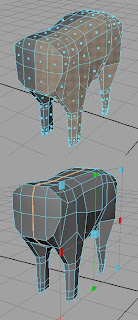 Using faces mode, select portions of your model which are relatively flat or simple when viewed from one angle (such as the entire front half of a character's body, the side of a vehicle, or the wall of a building). From the Create UVs menu choose Planar Mapping. Maya will pop up a new manipulator type with a large rectangular shape and controls at each corner. Use this manipulator to size & place your new projection, the position / angle from which Maya will attempt to apply texture data to this portion of your model. Note the lower image of this pair in which you can see the manipulator, as well as a distinct orange line which demarcates the UV Texture Border which was once the boundary around your selection. This is the line at which Maya split two adjoining sections of UVs.
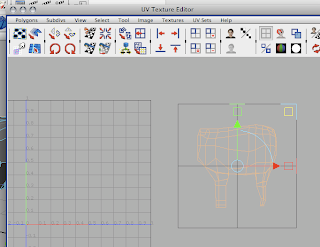
In the UV Texture Editor (found under the Windows menu) you will see a 2D representation of your formerly selected components. Using the standard Translate tool, move your new grouping of UV points off the center area of your grid for safe keeping (a 2D version of the typical translate manipulator should appear in the UV Texture Editor window if you have the tool active). If you can't select the UVs to move them, right click in the UV Texture Editor and choose "UV" as the selection method and then click-drag a selection box around the UV components you are moving.
If any part of this process fails on you, I highly recommend you simply undo your way back to the starting selection (previous to executing the Planar Mapping command) and try again. Also, if you find yourself unsatisfied with the results of your projection, you can simply perform the same steps again -- creating new UV maps is non-destructive, meaning that if you get it wrong once, doing it 5 more times even without undoing won't harm your model.
Repeat this procedure with the remaining parts of your model, creating additional planar projections for other flat or semi-flat areas and Cylindrical Mappings for tube-shaped components, such as legs or the neck of an instrument. I recommend that you do not use any mapping types other than Planar and Cylindrical, especially not Automatic. Feel free to experiment, but they likely won't be of as much use in practice.
Once you have made a selection of and projected a new UV map onto every part of your model, you should have a UV Texture Editor window which looks something like this (well, if you were starting with a half-built cow model...), with parts of your model strewn about:
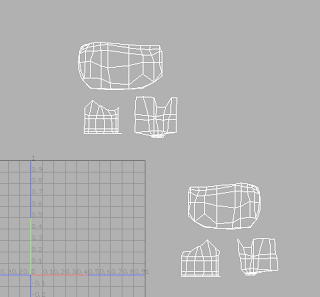
Translate/Scale them all down into the positive (0,0) to (1,1) area of the grid (upper right quadrant) and arrange them as you see fit. If portions of your layout are overlapping still, you may wish to go in and manually move some UVs to prevent overlapping. This is tricky to explain, but try to imagine a skinned animal being "pelted" and turned into a throw rug. All the outer facing surfaces of the animal's skin would be flattened out against a floor and none of them would overlap. This is the effect you want to go for with your UV layout.
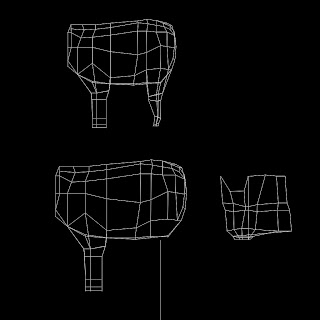
When you are satisfied with your layout, use the UV Snapshot... tool from the Polygons menu in the UV Texture Editor window to export an image of your polygon layout (Above is my UV Snapshot from in class on Wednesday which I then painted over in Photoshop to create my "What up?" cow texture). Remember the image format -- you can use anything other than "Maya IFF," but I personally recommend PNG, JPEG, TIFF, or Targa formats. Open up your UV snapshot image in Photoshop, create a new layer, and paint away. Put down whatever you like at this stage, just so long as we'll be able to see it in Maya to check your UVs when the texture is applied.
Speaking of application, go ahead and save that new painted texture of yours as a JPEG, TIFF, PNG, or Targa and open Maya up again. In the Windows menu, select Rendering Editors --> Hypershade. Create a new Lambert material from the Create bin to the left of the window. "Lambert2" or some such should appear in the topmost pane of your Hypershade window. If you can't see that pane try clicking on this button:
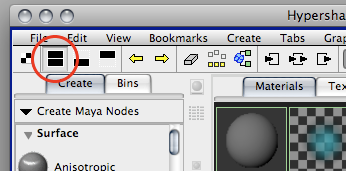
That will bring up both the upper and lower work panes on the right side of the window. Select your new Lambert material and in the Attribute Editor click on the little black and white checkerboard icon to the right of the Color slider. The Create Render Node window should appear. Click on the File texture icon near the top right of the list. In the Attribute Editor (third button from the top right of the main Maya window if it isn't open already), click on the folder icon next to the Image Name field in your File texture node and navigate with the file browser to your image texture file recently made in Photoshop.
Now, to finish the application, either click and drag (with the middle mouse button!) your Lambert material from the Hypershade window onto your model or select your model then right click on your Lambert material and choose Apply to Selection from the right click menu. If nothing seems to have happened, keep in mind that you might be in the wrong display mode. From the Shading menu of your Maya view panel select Hardwre Texturing from near the bottom of the list. You should now see your applied texture on your model. Ta-da!
Remember that this week is really just week 1 of texturing, so don't sweat it if not everything went smoothly. Just try all these steps and identify what doesn't make sense to you. Most important this week is for you to work on finishing your models and making sure that they are exceptionally clean without any unmerged vertexes or extra faces hiding inside them. You should email me your model file before class on Monday saved as the same thing you named it last week. Technically this is still a continuation of Assignment 4 from last week, so that name will likely be "firstName_HW04.ma". There will be another post with your Assignment 5 homework notes and more details on the UV layout process next week.

No comments:
Post a Comment