1.) Work Slowly and Deliberately
Remember that it's important to go back and double check your work once in a while to make sure you're not getting double extrusions, unmerged vertexes, or any number of other bizarre happenings which can occur while you are modeling. The easiest way to check your own work is to go to Component Mode, change to Vertex selection with the right-click menu, and then select some single vertexes to pull around in space. If they seem properly attached to their respective edges and faces, then all is good. It's easier to fix mistakes as they happen than to wait until a model is complete and clean the whole thing up.
2.) Try to Make 4-Sided Polygons
While Maya will compute a polygon of any number of sides, 4-sided layouts are best (and as a corollary, 4-edge intersections at each vertex are preferable as well). You will certainly run into situations where this is impossible though, such as when transitioning from a level of high polygon detail to one of low detail. In these cases, some 3 and possibly 5 sided polygons will become necessary, but use them sparingly.
3.) Attaching Shapes
When attaching shapes, you will almost always run into the above mentioned polygon layout issues. Try to plan ahead for these connections as much as possible by creating primitive shapes with matching numbers of sides (ex: an 8-sided cylinder and a 16-sided sphere are well matched). To change the numbers of sides on your primitives, go to the Create --> Polygon Primitives --> (shape name) Options Box. There you will find sliders and numerical inputs to alter the detail level of your primitives.
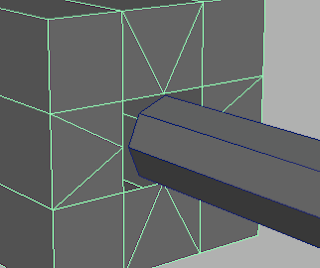
Once you have created shapes, you should begin adding detail to them with the Cut Faces and Split Polygon tools, both in the Edit Mesh menu. In this case I am attaching an 8-sided cylinder to a divided cube, so I must use the Split Polygon tool to double the number of attachment points at their intersection. Click and drag with the Split Polygon tool to position a point on an edge, release to save that position. Remember to slide points all the way to the end of an edge to lock them onto an existing vertex. You will find yourself making two triangles facing away from the high detail area of every intersection and one triangle facing toward it. You could do this with fewer triangles, but because it is a symmetrical intersection the extra triangles are preferable:

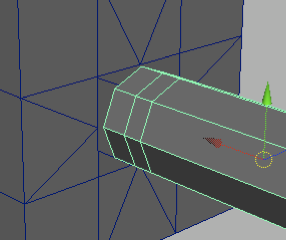
Once you have added sufficient detail to the lower detail area of your mesh, add some extra rows of edges to the other side of the connection to contain the area of transition between detail levels like so:
 Now activate Point Snapping and move the vertexes of one object to match those of the other at the point of connection. Point snapping can be activated with this button (and don't forget to turn it off when you're done!):
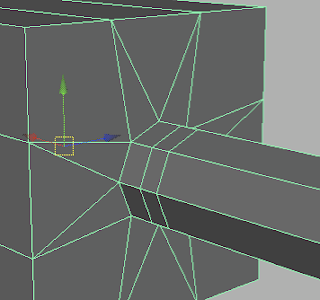
 Finally, with the Mesh --> Combine function, join these two objects. You will then be able to Merge the connecting vertexes (from the Edit Mesh menu) and make a complete, continuous mesh. If the Merge function is not making successful merges, check its Threshold value and try adjusting it upwards (or downwards, if it is merging too many points). Your finished connection should look something like this:
 As a last step, go to Edit --> Delete by Type --> History. This will erase the process of creation from your new object's history, which can help prevent errors from cropping up in the future. I encourage you to do this regularly.
4.) Normals
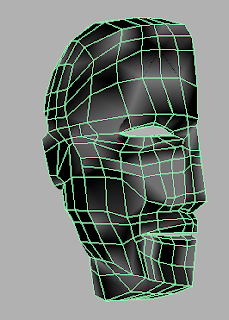
If you notice your model is developing some... blotchiness, it is likely due to a conflict in the alignment of face normals. Normals determine the direction Maya believes a polygon to be facing, so if they disagree from face to face, the rendering engine will quickly become confused and draw something like this:
 Credit goes to Yueh for this fascinating piece of layout mishap -- it's an impressive bit of modeling for a first assignment, too! To "fix" this problem, simply go to the Normals --> Conform command. Of course, it won't have really fixed the problem, because the true problem is caused by having multiple faces overlapping in the same area (lamina faces), and the only solution we've seen in class so far is to go in by hand and delete one of every face. But at least it'll look nicer for now!
5.) Plan Ahead
Don't forget to do some planning. Get out a sheet of paper and either draw or write down how many "parts" your model really has. Then make each part separately, either by extruding it from a central cube or by making them from separate primitives then combining them. Planning here is everything here, and the more of it you do the fewer your headaches will be.
Other than those tips, all I can say is good luck! When you're finished, email me the Maya scene file (remember, ".ma" format) before Tuesday (no class on Monday!) with the naming format "firstName_HW03.ma."

No comments:
Post a Comment