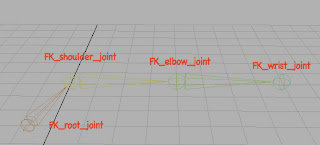
First, open up "armGeo.ma," the file I sent to you all containing a basic arm geometry. Next, build yourself a Joint chain for the FK arm: change your menu set to Animation using the pull-down option menu in the upper left hand corner of the Maya interface and from the new menus which appear select the Skeleton menu --> Joint tool and click 4 times with Grid Snapping turned on to create 4 joints at the locations you saw in class. Name them like this:

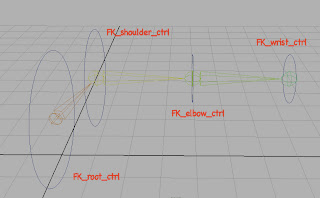
Next, build yourself a controller using the Create --> NURBS Primitives menu --> Circle tool. Make sure that Interactive Creation is turned off under the Create --> NURBS Primitives menu before you do this. You should have a brand spanking new NURBS circle in your scene now; delete its history (from the Edit --> Delete by Type menu). With the circle selected use the Edit menu --> Group command to create a buffer on the control. Name the NURBS cirlce "FK_root_ctrl" and the buffer "FK_root_ctrl_buffer," then, Duplicate (Edit menu) the new buffer three times to make 4 pairs of controls and buffers. Position them (by translating the BUFFERS, not the controllers!) at the root, shoulder, elbow, and wrist joints and name them (and their buffers) accordingly:

Open your Outliner by going to Window --> Saved Layouts --> Persp/Outliner (alternatively it's the third view preset button on the left hand side of the screen) and expand your view of the various controllers/buffers you've made so far. Using the Middle Mouse Button to drag a child onto a parent or by selecting first the child then the parent and pressing P, parent your FK_wrist_ctrl_buffer under your FK_elbow_ctrl, and your FK_elbow_ctrl_buffer under your FK_shoulder_ctrl, and your FK_shoulder_ctrl_buffer under your FK_root_ctrl. The finished result should look exactly like this:

Now we've got joints and controllers done. Let's make them talk to one another. Select your FK_wrist_ctrl, then select your FK_wrist_joint, and use the Constrain menu --> Orient Constraint (Options) to open up the Orient Constraint dialog box. Make sure Maintain Offset is checked, as well as All axes and press Add. Repeat this process for the elbow and shoulder. Remember to select the controller first, then the joint -- the relationship between them is "driver" and "driven," in that order. The action of the driver determines the results for the driven, so when creating constraints always select the "driver" first, then the "driven."
For the root we want to make a Parent Constraint, so this time select first the FK_root_ctrl then the FK_root_joint and select Constrain menu --> Parent Constraint (Options) to open the dialog box. Again check that Maintain Offset is active and that you are constraining to all axes and press Add. Your controllers should now be able to change the position of your joints! Try rotating and translating them to your heart's content.
 Notice that translating the elbow and wrist controllers is not useful -- so let's go ahead and disable that ability. In your Channel Box, select the 3 translate channels (their names, not the numbers next to them) of your wrist controller and right click on them. In the ensuing pop-up menu, choose Lock Selected.
Your channels will now be grayed out and you won't be able to translate this controller anymore. Do the same to the scale channels, then repeat this process on the elbow control. On the root control, lock only the scale channels -- we want to be able to translate it at will.
So, now you're basically done with your rig. Clean things up a little bit by grouping your joints and controls and renaming the new parent node FK_rig.
As one final step, let's skin your arm geometry to your joints. First Delete History (Edit --> Delete by Type menu) on the arm geometry, just to get us working with a clean slate. Select the arm mesh, then select your shoulder joint and use the Skin --> Bind Skin --> Smooth Bind command to connect the skin to the bones. Enjoy!
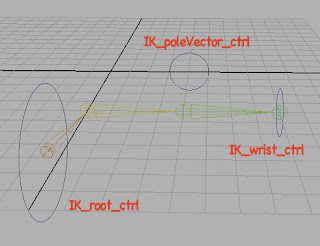
When you're finished playing with your FK arm, hide it by selecting the FK_rig group (which should contain all the nodes pertinent to your FK rig) and enter a value of 0 in the Visibility channel. Now, for the IK arm rig, we're going to repeat a lot of steps. So go ahead and create 4 new joints in the same place and with the same names as last time (exchanging the "FK" prefix for "IK"). Create three controllers the same way you did for the FK arm (again, using "IK" as your prefix) and position the wrist and shoulder controls in the same way as with the FK rig.
Your elbow control & buffer, however, should be renamed to IK_poleVector_ctrl & IK_poleVector_ctrl_buffer, respectively. Position them like so by translating and rotating the BUFFER, not the controller:

The next thing you'll need to do is tell Maya which direction you want the elbow joint to bend when you create an IK solver chain across it. This is pretty counter intuitive, so just trust me on it for now. Select your elbow joint and rotate it so that the bend in the elbow points toward the poleVector controller. It doesn't matter how far you rotate it. Next, use the Set Preferred Angle command from the Skeleton menu. Now, manually reset the elbow joint's rotation by entering a value of 0 in which ever channel you rotated it.
We can finally create our IK chain now by selecting the Skeleton --> IK Handle Tool (Options). In the tool options palette that appears, set your Current solver to ikRPsolver. Now, click on your shoulder joint, then click on your wrist joint. Ta-da! A new IK chain is created. You should see a new node in your outliner called ikHandle1. Parent it under your IK_wrist_ctrl and rename it IK_wrist_handle. Next, select your IK_poleVector_ctrl as the driver and IK_wrist_handle as the driven objects, then create a Pole Vector constraint from the Constrain menu.
You're almost finished with the basics of your IK rig. To complete it we need to make the wrist control do something to affect the rotation of the hand -- at the moment it just follows rigidly along the axis determined by the rotation of the elbow. To fix this deficiency select your IK_wrist_ctrl, then your IK_wrist_joint, and create an Orient Constraint from the Constrain menu. Remember to check that Maintain Offset is turned on under the constraint options. We should also tell the root controller how to affect the root and shoulder joints. Select the IK_root_ctrl, then the IK_root_joint, and create a Parent Constraint (Constrain menu) with Maintain Offset checked in the options dialog.
Finally, let's clean things up a little. Select the IK_poleVector_ctrl_buffer, IK_wrist_ctrl_buffer, IK_root_ctrl_buffer, and IK_root_joint and group them (from the Edit menu). Rename the resulting parent as IK_rig. Go ahead and lock off some channels you wont need on various ctrls: scale on the wrist and root controllers, and scale+rotate on the poleVector controller. If you haven't done so, skin a duplicate of your old FK armGeo to your joints in the same manner you did with the FK rig (remember that if you are duplicating after skinning you will need to unlock channels on the arm geometry and unparent it from the FK_rig group!).
Done. Play with your rig and find out if it all works. Try painting weights from the Skin --> Edit Smooth Skin --> Paint Skin Weights (Options) to adjust the way deformations propagate across joints. Try to break the rigs. When you're satisfied, turn in a single Maya scene file with the name yourName_HW06.ma before the next class for full credit.
See you on Monday!

No comments:
Post a Comment