So, it's time to do some modeling! We're going to be starting with the Cube as our basic unit in this lesson, slicing it in half, mirroring it, and then using the Extrude and Cut Faces tools to expand it into a model. A few reminders:
1.) Mirroring a model.
To mirror a model, you'll want to first create a cube, then switch to your Front view panel, using the space bar to go in and out of the 1-up and 4-up view modes. In the front view, with your cube selected, bring up the Edit Mesh --> Cut Faces tool and click-drag to make a cut. Try to line your cut up with the vertical center line of the screen, thus cutting the cube in half cleanly. Hold sown the Shift key to force the Cut Faces tool to lock at 45 degree angles, which will make the creation of a perfectly vertical cut easier.
Once your cube is cut, switch to Component Mode (hotkey: F8), then right click on the object and use the ensuing menu to activate Faces selection. With the Selection tool active, select all the faces on the left side of your newly cut cube and delete them. With the F8 key, go back to Object Mode. Now, from the Edit --> Duplicate Special (Options) menu, create a mirrored copy of the half-cube. Set the Geometry Type to Instance. If you cut it vertically in the front view you'll want to set the Scale to -1 in the X axis. Remember the axis color code if you're not sure (Red = X, Green = Y, Blue = Z)!
2.) Extruding
To extrude a face from your object, switch to Component Mode (F8), activate Faces selection (right click menu), select one or a group of faces, and go to the Edit Mesh --> Extrude command. Your manipulator will immediately change to a new type, and you should switch back to the regular translate tool. Now just pull your new extruded faces in whatever direction you desire! Don't forget that even if you forget to pull the new extruded faces out from their starting location they have still been extruded. If you forget about them you'll soon discover some very funky stuff happening to your model (many of you have already experienced this).
If you run into the problem of extruded faces splitting apart after extrusion, go to the Edit Mesh menu and check that Keep Faces Together is checked.
3.) Planning
Don't forget to plan! Look at some reference and get a basic idea of the layout of your object before you begin attacking it. If you're creating a dog you'll know that it needs at least four protrusions from the bottom from which to sculpt legs, so cut your base cube up to accommodate for them. It is much easier to make the majority of your cuts / extrusions before you begin pushing and pulling vertexes to shape your model.
4.) Don't be Afraid to Start Over
Really, don't. It will go so much faster to make the same model the second time, you won't even believe it. So if things get really messed up and you can't figure out why your polygons are exploding everywhere, just start over! It won't take you nearly as long as you think.
When you're finished, email me your Maya scene file with the name firstname_HW03.ma by Sunday at midnight for full credit. And be creative!
Thursday, October 1, 2009

Thursday, September 24, 2009
Assignment 2: Basic Lighting & Rendering
So, this week we're going to focus on lighting & rendering the 10 cube scene you created last week.
To do so, we're going to begin creating lights. I won't go into tremendous detail about the settings on lights, but let's at least walk through the basic process of creating and editing a light. To create a Point Light, go to the Create menu --> Lights --> Point Light. Once created, you'll be able to translate, rotate, and scale a light just like you would any other object. Opening up the Attribute Editor (third button from the top right) you'll see some new settings under the lightShape tab (if you created a Point Light it will be the pointLightShape1 tab).
If you can't see your lights in the Maya view panel yet remember to set the shading mode to Smooth Shade All under your view panel's Shading menu. Then check the Lighting menu of your view panel and check the Use All Lights option. You should get a rudimentary preview of your lighting in the view panel now.
Adjust the color, intensity, and shadow options to produce your desired light effects. When you're ready, switch the light to either a Spot Light or Directional Light to give yourself the ability to aim it for a more specific effect. Remember that a Directional Light will shine light on the scene from every position at the same angle while a Spot Light will only shine light in the chosen direction from within its falloff cone.
Shadow options are accessible from the Shadows section of your light's attribute editor. Simply click to expand. You'll see options for Shadow Color, Resolution, and Filter Size among a myriad other buttons and sliders. Those are your three primary shadow controls, but you will need to first check Use Depth Mapped Shadows before any of those become available.
The most basic lighting setup is typically composed of 3 lights: a Key, a Fill, and a Rim (also called a Back light). Your Key light determines the main lighting direction of your scene and the primary color of the light. Your Fill light should be somewhere to the side of the Key light, adding extra light around the edges and "filling in" the darkest areas not lit by your Key. The Rim light is used to cast an alternative and sometimes contrasting hue from the reverse direction of the Key light. Your Rim light will often be very dim or use a darker color to establish a variation on the default black which typically represents unlit areas of the scene.
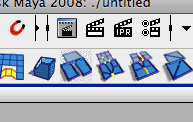
Advanced effects like shadows won't show up in your view panel, so when you like your basic lighting setup you should start using the Render button to see what the final result looks like (it's the black and white one that looks like a film slate, 2nd from the left):
This will pull up the Render View window -- you can pan and zoom around your rendered image all you like using the regular Alt + MMB and Alt + RMB commands you use elsewhere in Maya. Also note the Keep Image / Remove Image buttons (the little down/up arrow symbols near the right edge of the image below): they will let you store completed renders to check against future changes. Whenever you press Keep Image it will be added to a slideshow cue which you can scroll through using the slider at the bottom of the Render View window.
From the Render View window's File menu you can choose to save your image to a file with the Save Image As... command. Remember to change the Image Type to something other than the default ".iff" format. JPEGs will be fine for this class.
When you are satisfied with your work email me one image of your rendered scene and your Maya scene file with the names firstName_HW02.jpg and firstName_HW02.ma, respectively. Remember: have fun with this assignment! The tools for lighting/rendering at this level are fairly simple, so just go wild and experiement with lights and their settings.
To do so, we're going to begin creating lights. I won't go into tremendous detail about the settings on lights, but let's at least walk through the basic process of creating and editing a light. To create a Point Light, go to the Create menu --> Lights --> Point Light. Once created, you'll be able to translate, rotate, and scale a light just like you would any other object. Opening up the Attribute Editor (third button from the top right) you'll see some new settings under the lightShape tab (if you created a Point Light it will be the pointLightShape1 tab).
If you can't see your lights in the Maya view panel yet remember to set the shading mode to Smooth Shade All under your view panel's Shading menu. Then check the Lighting menu of your view panel and check the Use All Lights option. You should get a rudimentary preview of your lighting in the view panel now.
Adjust the color, intensity, and shadow options to produce your desired light effects. When you're ready, switch the light to either a Spot Light or Directional Light to give yourself the ability to aim it for a more specific effect. Remember that a Directional Light will shine light on the scene from every position at the same angle while a Spot Light will only shine light in the chosen direction from within its falloff cone.
Shadow options are accessible from the Shadows section of your light's attribute editor. Simply click to expand. You'll see options for Shadow Color, Resolution, and Filter Size among a myriad other buttons and sliders. Those are your three primary shadow controls, but you will need to first check Use Depth Mapped Shadows before any of those become available.
The most basic lighting setup is typically composed of 3 lights: a Key, a Fill, and a Rim (also called a Back light). Your Key light determines the main lighting direction of your scene and the primary color of the light. Your Fill light should be somewhere to the side of the Key light, adding extra light around the edges and "filling in" the darkest areas not lit by your Key. The Rim light is used to cast an alternative and sometimes contrasting hue from the reverse direction of the Key light. Your Rim light will often be very dim or use a darker color to establish a variation on the default black which typically represents unlit areas of the scene.
Advanced effects like shadows won't show up in your view panel, so when you like your basic lighting setup you should start using the Render button to see what the final result looks like (it's the black and white one that looks like a film slate, 2nd from the left):

This will pull up the Render View window -- you can pan and zoom around your rendered image all you like using the regular Alt + MMB and Alt + RMB commands you use elsewhere in Maya. Also note the Keep Image / Remove Image buttons (the little down/up arrow symbols near the right edge of the image below): they will let you store completed renders to check against future changes. Whenever you press Keep Image it will be added to a slideshow cue which you can scroll through using the slider at the bottom of the Render View window.
From the Render View window's File menu you can choose to save your image to a file with the Save Image As... command. Remember to change the Image Type to something other than the default ".iff" format. JPEGs will be fine for this class.
When you are satisfied with your work email me one image of your rendered scene and your Maya scene file with the names firstName_HW02.jpg and firstName_HW02.ma, respectively. Remember: have fun with this assignment! The tools for lighting/rendering at this level are fairly simple, so just go wild and experiement with lights and their settings.
Wednesday, September 16, 2009
Assignment 1: Basics
Homework 01: The Basics
Using only the tools you learned in class 3 (camera tools: orbit; pan; zoom + transform tools: translate; rotate; scale), create a basic sculpture/scene/diorama using only 10 primitive polygon cubes.
You may do anything you like to the cubes so long as you use only the three primary transform manipulators (remember the shortcut keys: trans. = w, rot. = e, scale = r), but try to be succinct and clear with your designs. This assignment tests you on how closely you were paying attention to the basics of the Maya interface, but it is more importantly about stretching your artistic abilities and forcing you to come up with creative design solutions when presented with limited technical options. Cater your designs to the available medium -- a great idea that can't be executed with the tools at hand is not a great idea.
As always, assignments are due on the following Sunday at midnight and should be emailed to me as a file attachment with the name "firstname_assignment#.ma".
Have fun!
Using only the tools you learned in class 3 (camera tools: orbit; pan; zoom + transform tools: translate; rotate; scale), create a basic sculpture/scene/diorama using only 10 primitive polygon cubes.
You may do anything you like to the cubes so long as you use only the three primary transform manipulators (remember the shortcut keys: trans. = w, rot. = e, scale = r), but try to be succinct and clear with your designs. This assignment tests you on how closely you were paying attention to the basics of the Maya interface, but it is more importantly about stretching your artistic abilities and forcing you to come up with creative design solutions when presented with limited technical options. Cater your designs to the available medium -- a great idea that can't be executed with the tools at hand is not a great idea.
As always, assignments are due on the following Sunday at midnight and should be emailed to me as a file attachment with the name "firstname_assignment#.ma".
Have fun!
Tuesday, September 8, 2009
Welcome, class of 2009 (sort of)!
This is the blog for students enrolled in Art 374 at the University of Massachusetts -- otherwise known as Computer Animation 1 and popularly referred to as Maya 1.
Use this blog to see your class assignments and get in contact with your classmates and your instructor. Use the comments section of each post to discuss amongst yourselves and with me: questions, comments, funny stories, links to pertinent information. Someone will always get back to you.
If you really can't get over a hurdle on your current assignment, shoot me an email at jedmitchell@art.umass.edu. You can usually get a hold of me very quickly.
Above all else, have fun -- and welcome to 3D.
Jed
Use this blog to see your class assignments and get in contact with your classmates and your instructor. Use the comments section of each post to discuss amongst yourselves and with me: questions, comments, funny stories, links to pertinent information. Someone will always get back to you.
If you really can't get over a hurdle on your current assignment, shoot me an email at jedmitchell@art.umass.edu. You can usually get a hold of me very quickly.
Above all else, have fun -- and welcome to 3D.
Jed
Subscribe to:
Posts (Atom)
