First, up, open the Render Settings window from Window --> Rendering Editors. You should see this:
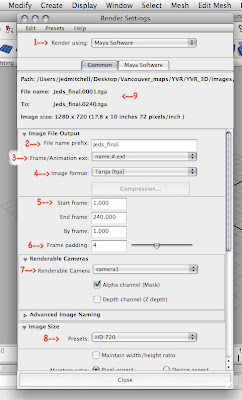 This is the Common tab, where your generic frame size, time range, file name, etc. stuff is set. A breakdown of items you'll find in this window:
1.) Render using. Make sure this pulldown menu is set to Maya Software.
2.) File name prefix. This is where you'll enter a name for your rendered images. Preferably, use "yourName_final" or something like that.
3.) Frame / Animation ext is what defines how the images are named, if they are a still or an animated image sequence. Basically, if you're making a still image, just use name.ext [Single Frame], and if you're rendering an image sequence use name.#.ext.
4.) Image Format. Use PNG, Targa, or Tiff. DO NOT use Maya IFF (almost nothing besides Maya can read this file type).
5.) Set your Start Frame / End Frame to the frames you want your animation to start / finish playing on. If you are using name.ext [Single Frame] from #3, this area will be grayed out and only the current frame will be rendered.
6.) Frame Padding determines how many leading zeros will be added to your file name's frame number. Just set this to 3 or 4. DO NOT leave it at 1 (the default).
7.) Renderable Camera. If you have created a second camera (besides the default, persp) from which you intend to render your scene you will need to set it here. Don't forget this one!
8.) Image Size presets. This is the frame size of your image. You can enter a custom size below, but I'd suggest sticking to the presets. I will be compiling our show reel at HD 720, so if you are doing animation that's probably a good size.
9.) Path / File Name preview. This area, near the top of the Render Settings window, will show you a preview of where your images will be saved and what they will be called. Double check this for errors before you render! Also, you can't change the path where they are rendered yet -- we haven't covered that aspect of the software in our class.
With those Common settings ready, move over to the Maya Software tab (#10):
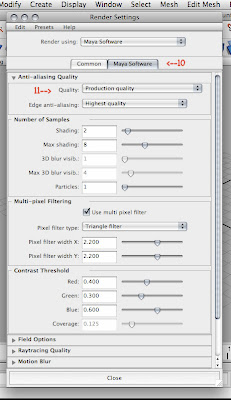 11.) The Quality dropdown menu is the last setting you'll need to alter. Basically, just set it to Production and it will fill out all the details below (and there are a lot of them).
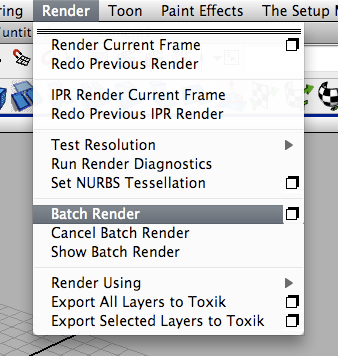
Once all of that is set, change to your Rendering menu set from the pulldown at the top left of your main Maya window and find the Render menu. Locate Batch Render there and click it.
Maya will chug away for a while (progress updates will appear in your Status Line at the bottom right of the Maya window) and produce your desired image / image sequence at the path determined in point #9 above. To assemble them into a movie file, you'll need a copy of Quicktime Pro (or Premier, Final Cut Pro, After Effects, etc. -- but I'm only writing instructions for Quicktime), which is installed on all our lab computers.
In Quicktime, go to File --> Open Image Sequence... and select the first image (probably called something like Jed_final.0001.tga) of your rendered sequence. Also change the Frame Rate to 24fps (which is what all of your Maya projects should be set to), and hit OK. Quicktime will import all your frames and assemble them into a movie. Play it to see if it looks how you want it to. If it doesn't, fix the problems in Maya, re-render, and repeat this assembly process in Quicktime with the fixed image sequence.
You have one final step. With a completed movie in Quicktime, you need to export it as a standalone movie. Go to File --> Export... Here you'll need to set a few things. First, make sure you're exporting as a Movie to Quicktime Movie:
 Then press the Options... button, where you'll see sections for Video, Sound, and Prepare for Internet Streaming. Just uncheck Sound and Prepare for Internet Streaming, as you need neither of them. In the Video section, press the Settings... button:
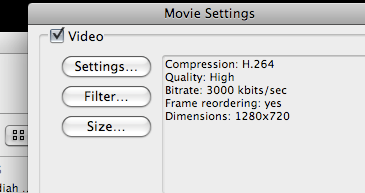 Where you'll see this screen:
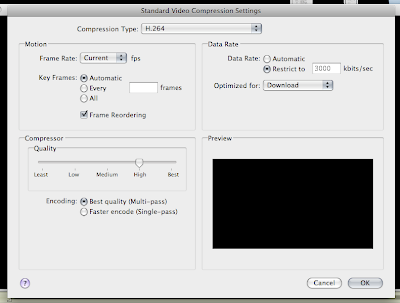 If you know how video transcoding works, feel free to play around with these settings to make your movie look its best. But if you're unfamiliar, just copy the settings from my image above exactly. Now just hit OK on every dialog box which has opened up and save your new movie. Quicktime will bring up a progress bar and chug away for a minute or two, finally producing a tidy little movie file for you.
 Email that movie file, your Maya scene file (or several, if you are using referencing), and your texture files to me before noon tomorrow to make it into the final showing reel. If you are just making still images, simply attach those instead of a movie file to your email. If the files are too large for a single email, feel free to send me several!
